Hello wednesday - say it with a heart
12/06/2013

Don't you just LOVE wednesday's? Say hello to wednesday "hello wednesday" It's all downhill from now on to the weekend - yippee!!!
Need an idea for a quick fathers day prezzie? Then this may be just the thing for you.
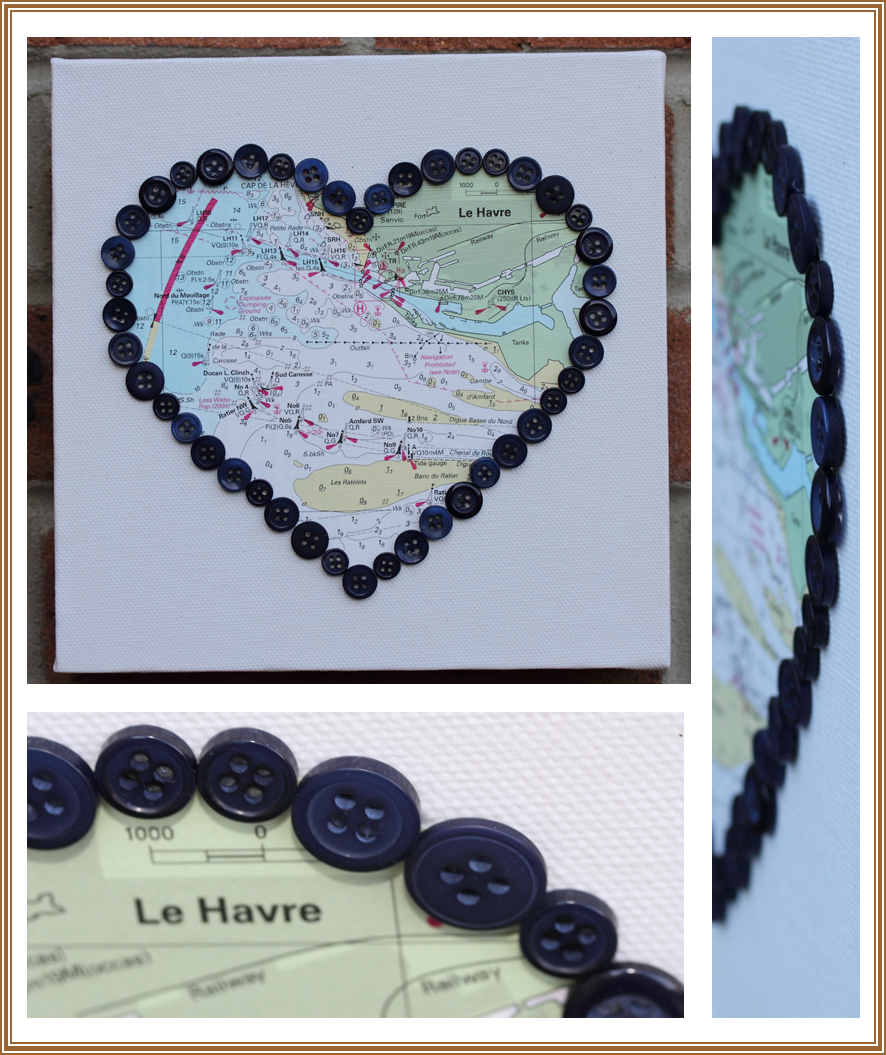
I used an old chart from our sailing days, but you could use a map. If you have a favourite place you like to visit, or a special holiday then it would be perfect to use that map. I drew a heart shape on to paper and then cut it out. I laid it on top of my chart to get the position correct. Stuck it with a few bits of tape and then cut round my heart.
The box canvas I have had for ages and came from The Works. I used décopatch glue to stick the heart to the frame, covering it with the glue. Once dry I used our new Navy buttons here to stick around the heart shape.
It looks brill on a brick wall - maybe in a garage, perfect for Dad.
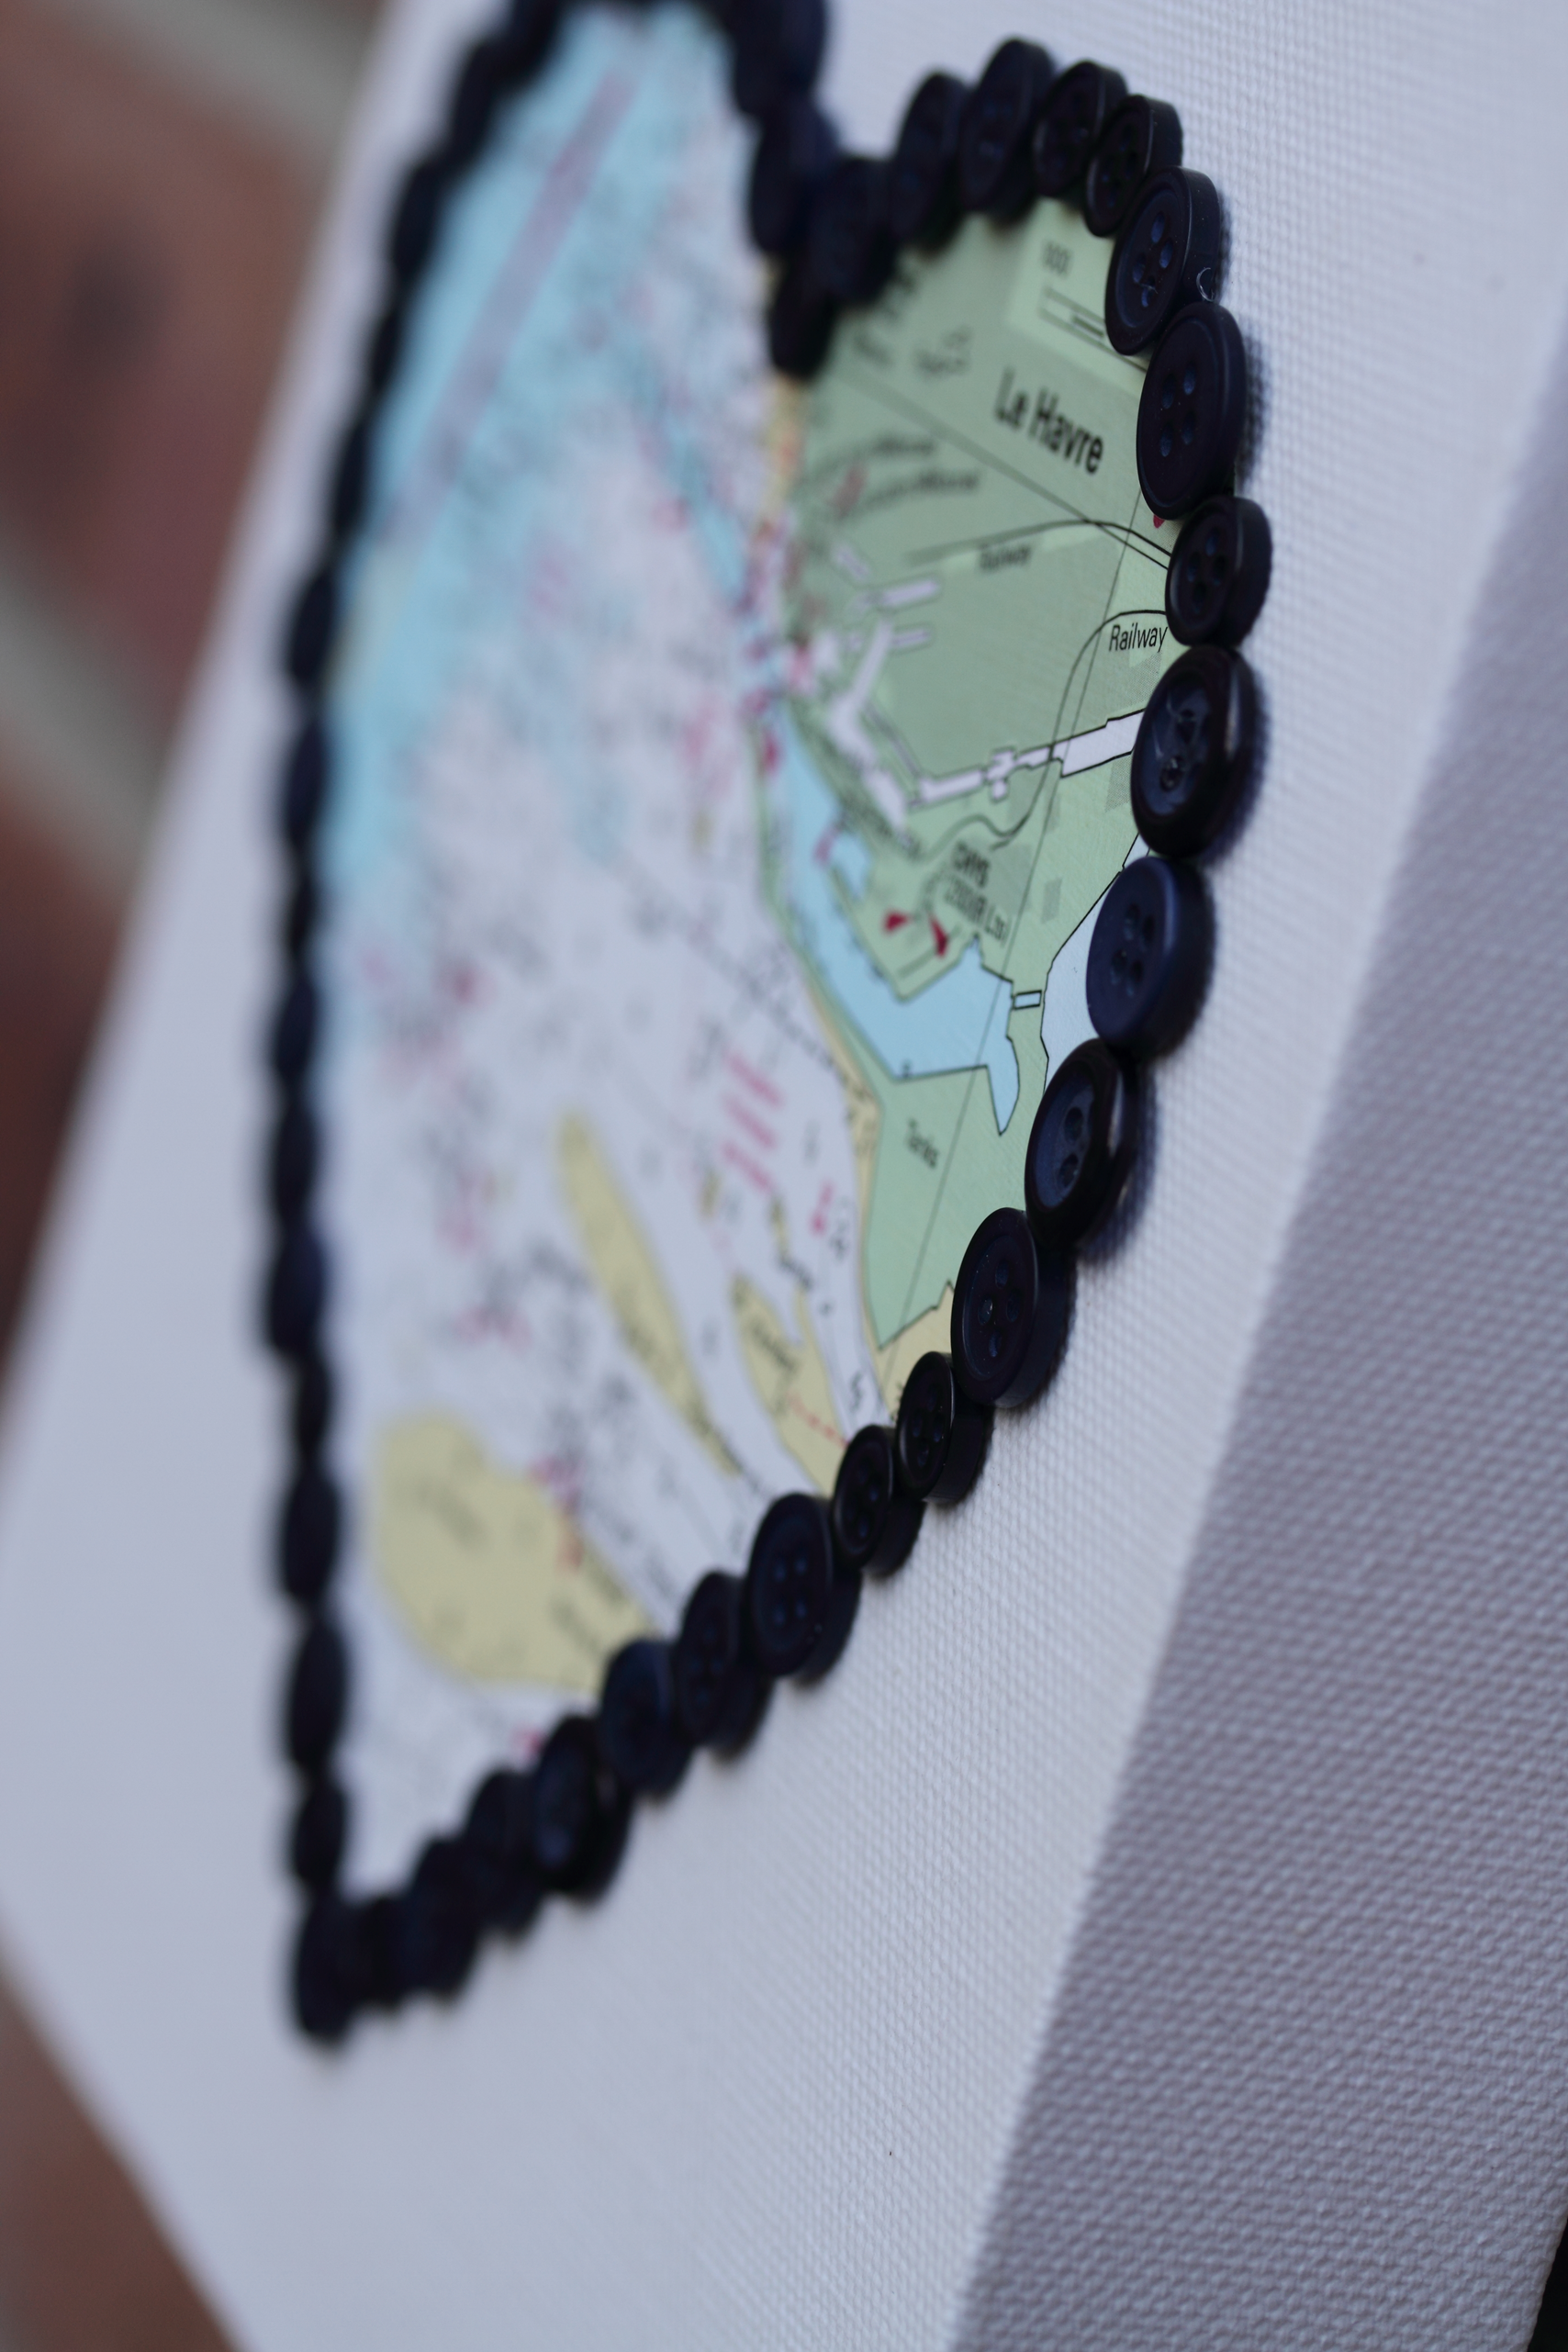
Le Havre holds a special place for Tony and I, mainly fear of being run over and sunk by the massive channel boats.
Quite scary but it was fun!
Top 100 Craft blogs to follow in 2013
10/06/2013
We are on the list!
Wow - how did that happen?
Not sure what the criteria was to get on the list, but we are there.
You have to scroll down a bit - we are number 53
Think this is the first time we have been in the top 100 on any list, so feeling happy

Claiming my blog on Bloglovin
07/06/2013
Follow my blog with Bloglovin
Nautical week - sailing away
07/06/2013
Morning everyone.
How could we have nautical week without a boat!
How could we have a themed ribbon week without a cake!
What do you think?
I probably shouldn't say this - but I am sooooo pleased with my cake.
I have never fondant iced a cake before, never made a paper boat and never made ribbon sails!
If I can do it, so can you.
The cake is a Victoria sponge filled with strawberry jam (Tony's favourite).
I covered the outside of the cake also with the jam, (Tony is not keen on butter icing).
I gather the jam helps the fondant icing to stick to the cake.
I rolled out the fondant icing, laid it on top of the cake and smoothed it down with my hands.
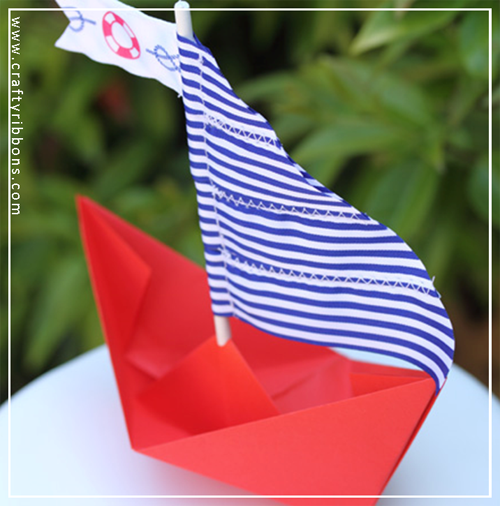
The paper boat is a A4 piece of paper, same colour both sides.
I followed the instructions on WikiHow here
My first boat was rubbish!!
But I soon got the hang of it, and even Syd and Sam were able to make them.
We have so many paper boats now in the warehouse!!!
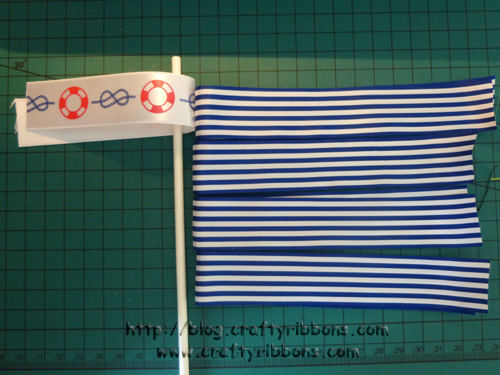
I used a hole punch to make the hole to insert the mast,
which is a long paper stick (left over from my ribbon tulips here)
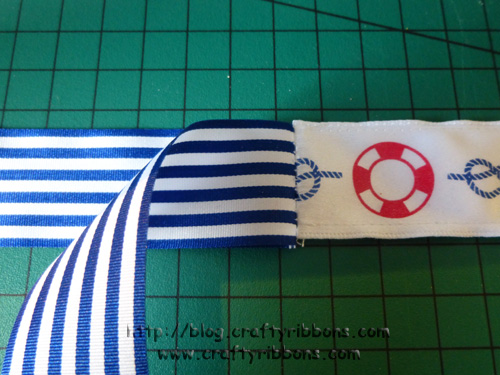
Now the ribbon bit.............SAILS


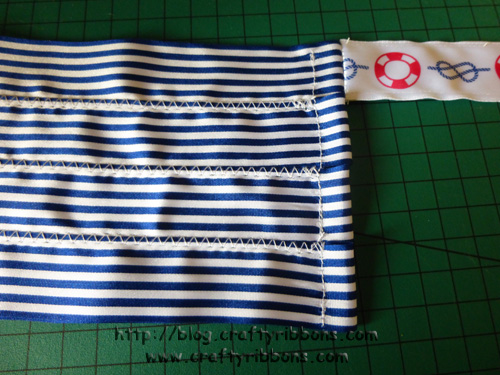
1. Sew the nautical ribbon to one of the pieces of the navy stripe sail ribbon in the centre.
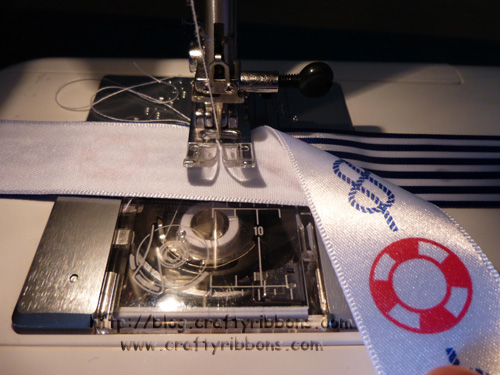
2. Lay the ribbons on the work surface so you know how to sew the sail together.
3. Sew the edges of the flag.
$. Open the ribbons out and flatten with your fingers to create the flag.
5. Change your machine foot to the zipper foot. Insert the mast between the navy stripe ribbon layers
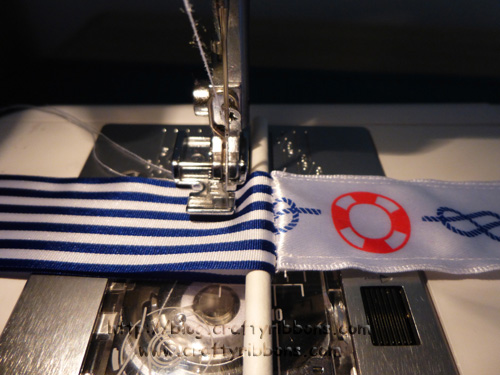
Machine the ribbon as close to the mast as you can.
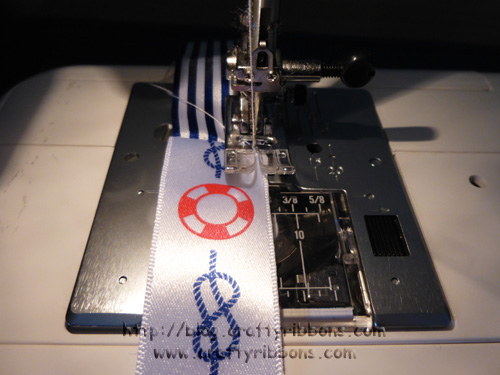
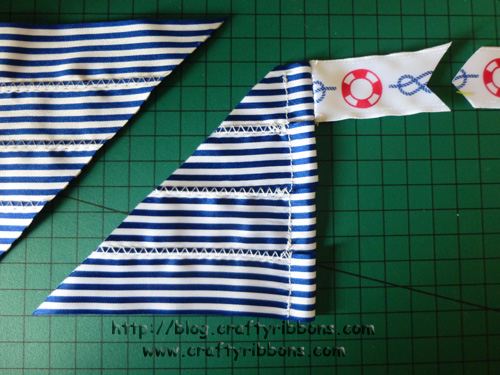
6. Insert the next sail ribbon and continue machining.

7. Repeat until all 4 pieces of ribbons are sewn to the mast.
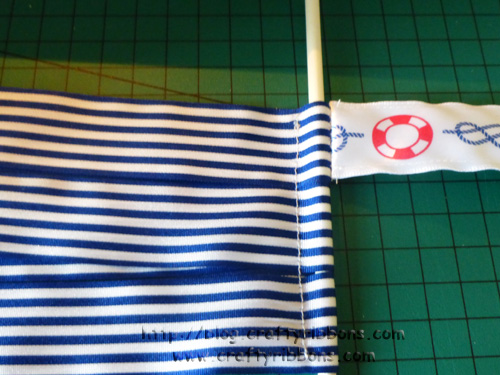
8. Remove the paper mast stick and zig zag the lengths of ribbon together.
Make sure you do not machine in the mast channel.
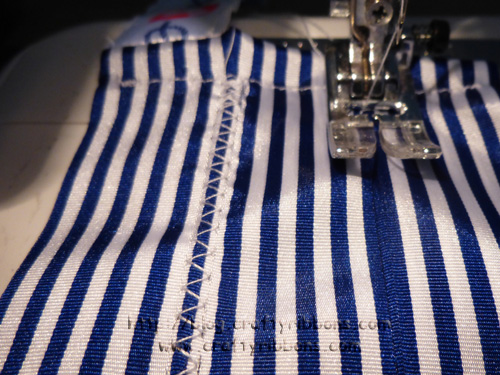
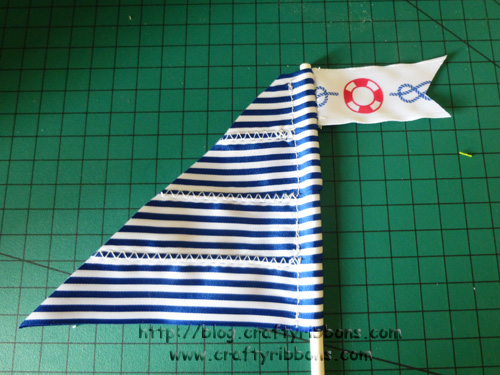
9. Sewn sail. I did not not iron mine as I wanted a wind swept look!
10. Cut away the excess ribbon, do not worry if the ends fray - all part of the look.
11. Insert the paper mast stick.
Now all you have to do is add the mast to the boat.
The kiddies all wanted the boat and Uncle T wanted the cake!!!!
Over the past week you have seen my ideas and those of our Design Team, BUT.....
.....what would you make if you had some of this nautical ribbon collection?
Do tell us in a comment and we will pick a winner on Tuesday
Remember to refresh your screen after leaving a comment,
to ensure it has not been eaten. Any problems email it to us craftyribbons@gmail.com
That's it, no more nautical ideas this week, shame I did enjoy going to the beach - for research I promise!
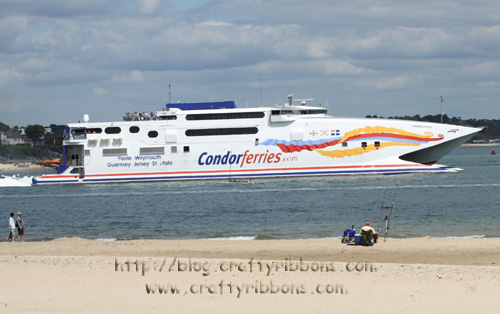
I must of had ribbons on the brain, Condor came out of Poole harbour, I turned to Tony and said
"Look Craftyribbons ferry has ribbons on it"
Nautical week - Design Team
05/06/2013
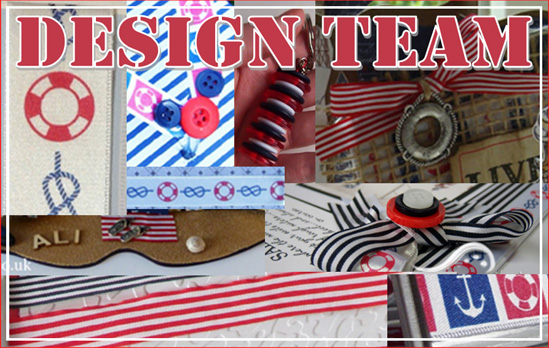
Our fantastic Design team have Jumped onboard and made some amazing creations with the ribbons and buttons.
I have attached links to each girls blogs, so why not while away a few moments and go and visit them.
They all have a way with ribbon!!
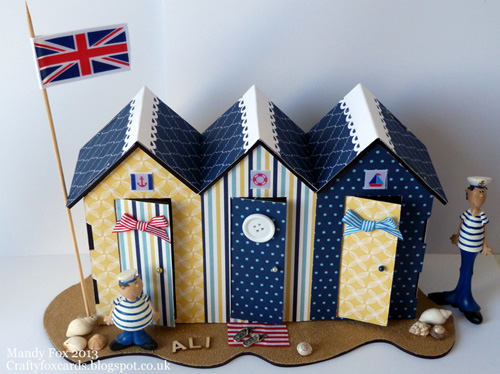
Mandy our Team Leader knows me well, look she has left my flip flops on the mat
and writtern my name in the sand.
Find Mandy's beach hut here
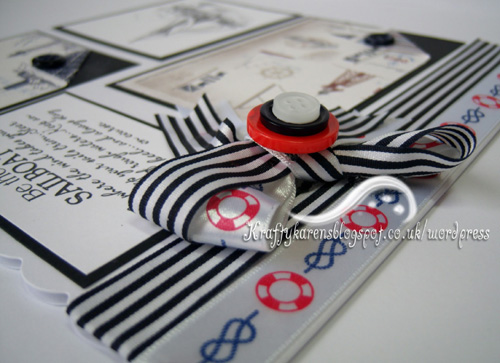
Karen has been tieing herself into knots bows!
Karen nautical card is here

Now you are talking Elaine - ribbon and button flip flops!
Find these, Elaine's stunning footwear here
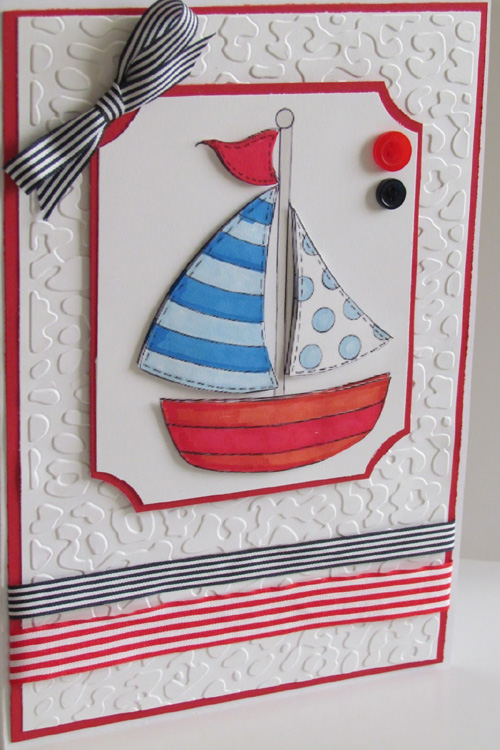
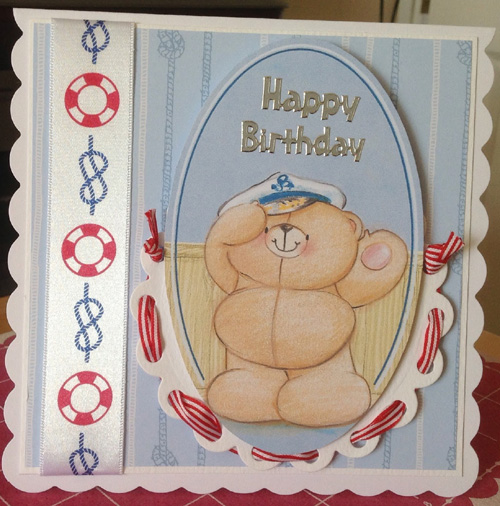
Carol this card floats my boat!
Find Carols clean simple and spot on card here

Laura has come over all boaty, and made this button keyring for her yacht!
Join Laura on her yacht here
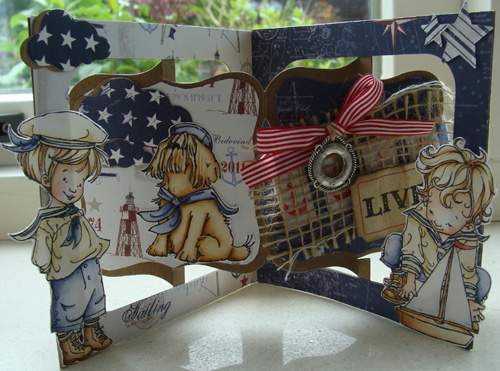
Anke has gone for the 3D look, what a fab card creation.
Find all Anke's work here
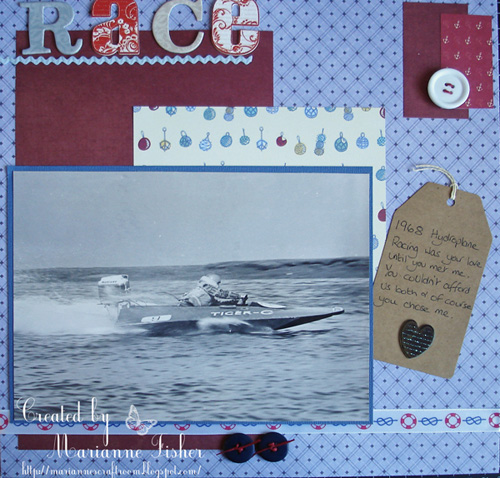
Marianne is feeling the need for speed - well her husband!
Join Marianne on her boat here
Kelly is joining the ship mates with her card.
Pop over and say "Ahoy there Kelly" here.
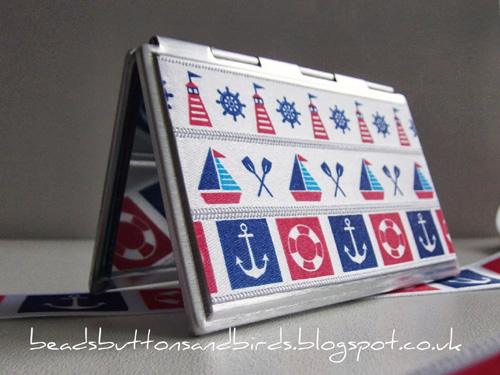
Laura has settled down in her cabin, time to have a looksee.
Check out Laura's nautical mirror here
Thank you girls for having a play with our NEW Nautical ribbons and buttons here.
We also hope that you have navigated your way around our Design Team blogs succesfully.
Pop back tomorrow to see what I have created, my creation BUT Sydney's idea.............oooooh.
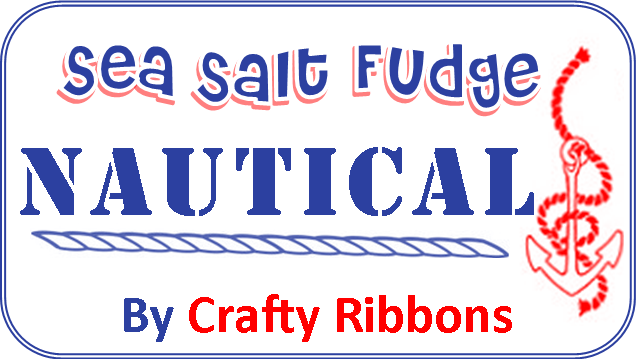
Nautical week - sea salt fudge
04/06/2013
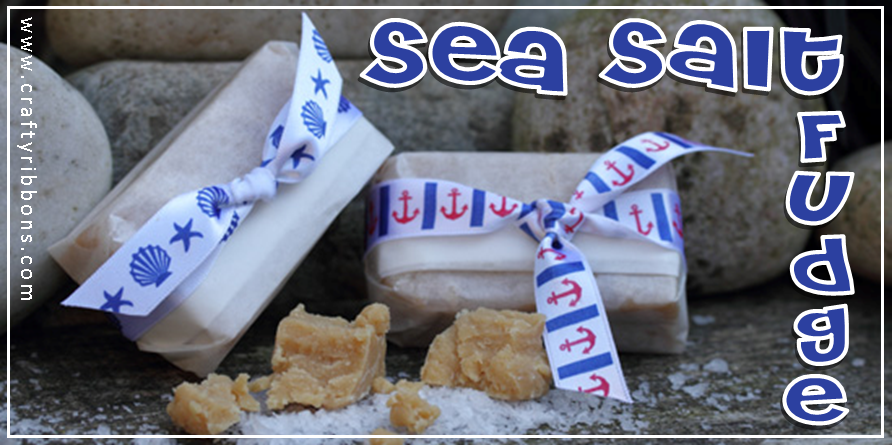
I hope you do not think this is a cop out. White baking parchment wrapped with ribbon.
The contents are awesome!
Everyone would love a parcel like this.
Firstly let me explain, I have never made fudge before, but Bev and I have been on rather a fudge kick of late.
Most Monday mornings we share our fudge bounty from our weekend trips.
While in Dartmouth, I found some sea salt fudge and it was to die for. Very expensive and did not last very long!
Bev had a brain wave and said "Make some Ali".
Ooh er missus, so I gave it a whirl. I almost wished I hadn't this fudge is so good we cannot stop eating it!
I came home from work yesterday and made a second batch.
I am not a cook, so would not dream of a tutorial but here are the details of the fudge.
1. Grease and line a 20cm baking tin.
2. Place the sugar, milk, butter and condensed milk into a large heavy-based sauce pan.
Stir over a low heat until the sugar has dissolved.
Over a low heat bring to the boil, stirring all the time and simmer for 10-15 minutes.
Stir continuously during this time, making sure you scrape across the bottom of the pan.
Test the fudge by dropping a small amount into cold water. If it forms a ball it is set.
3. Take off the heat and stir in 1 tsp of sea salt and 1 tsp of vanilla extract.
4. Allow to cool for about 5mins.
5. This stage is the hard bit! Beat the fudge mixture until it becomes thick and grainy.
You can feel the difference in the texture as you beat.
6. Pour into the prepared baking tin.
7. Sprinkle over ½ tsp of sea salt and slightly press into the fudge with the back of a spoon.
8. Leave to cool and set. (Although it is very nice warm as well!)
9. Cut into squares or oblongs, wrap in baking paper and wrap with ribbon.
I made another batch of this fudge last night, and it was not a fluke.
It tasted just as good as the first batch!
Which ribbon would you wrap your fudge up with?
Do tell by leaving us a comment and we may send you some!
We will pick THREE winners next Tuesday.
Remember to refresh your screen after leaving a comment,
to ensure it has not been eaten. Any problems email it to us craftyribbons@gmail.com
ummmmmm..........can I get away with keeping all this fudge to myself.
Nope - it's made for sharing
Our Friday FREEBIE winner is.........
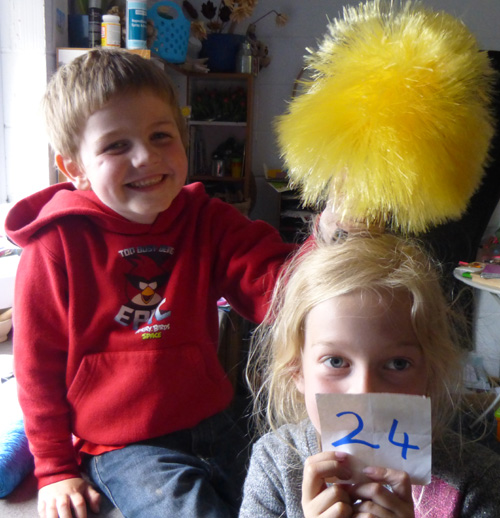
Number 24 = Kate
I love the nautical ribbons, they are perfect for summers cards, and would be perfect if i won as my husband is taking me away to the seaside in september as a combined 40th birthday and 13th wedding anniversary pressie, will be our first ever break away on our own, so i would use the ribbon to do smash book pages about our holiday
Kate xx
Congratulations Kate you have some wonderful Nautical ribbons, brand NEW only went on the site yesterday! Please email bev.craftyribbons@gmail.com with your address so she can pop them in the post to you.
Have a great sunny day.
Hello wednesday - ribbon birthday cards
29/05/2013
Don't you just LOVE wednesday's? Say hello to wednesday "hello wednesday" It's all downhill from now on to the weekend - yippee!!!
I do like a birthday card that has a bit of ribbon on it!
Whether a simple bow, a line of ribbon or both it finishes a card to perfection. Thank you for my ribbon cards girls.
Not sure this card from Bev counts....................
.......................but I do love it.
Have a great hello Wednesday everyone.
Summer Bunting week - flags
24/05/2013
I made a Cake
I made a Birthday Cake
I made MY Birthday Cake!
It's my Birthday today.
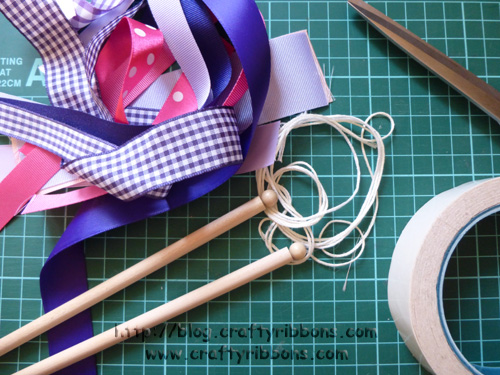
No sewing today - double sided tape and bits of ribbon!
-
scissors
-
double sided tape
-
doweling and a couple of beads
-
embroidery thread or string
-
ribbon - any width any colour

1. Cut a two lengths of doweling and stick two wooden bead to the top, to look like flag poles.
2. Tie the embroidery thread around the top of a pole and secure with a knot.
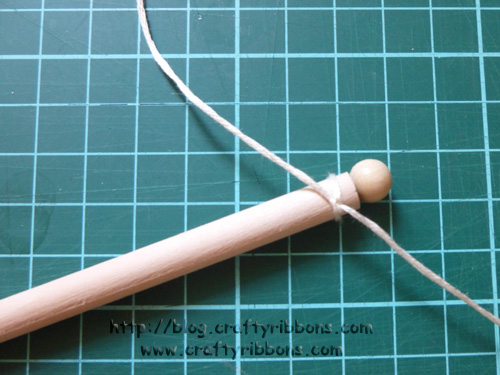
3. Repeat for the other pole.
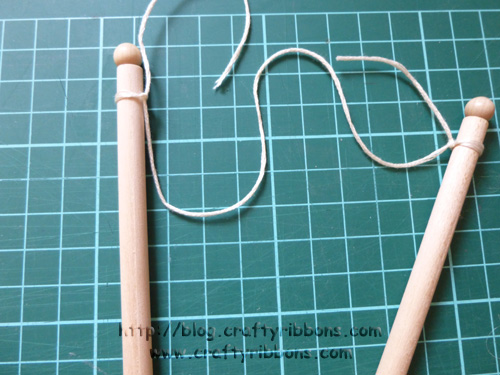
4. Cut a piece of ribbon into a flag shape and place under the thread.
Put a small piece of double sided tape onto the ribbon just below where the thread will sit.
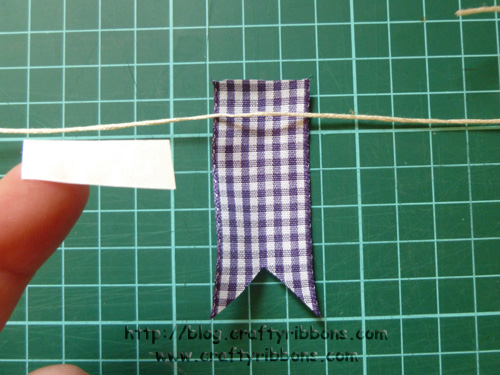
5. Fold the ribbon over the thread and stick it down.
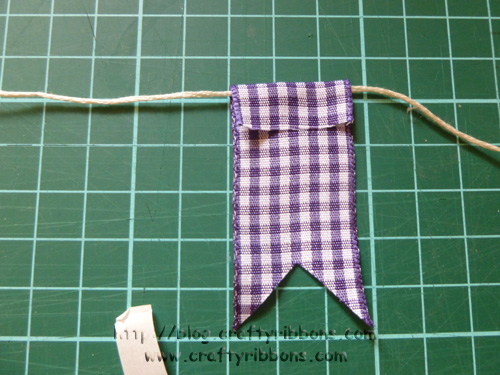
6. Repeat with other bits of ribbon.
Cut the ribbons at different angles or fray the ends to make them all a little different.

Just add them to your cake.
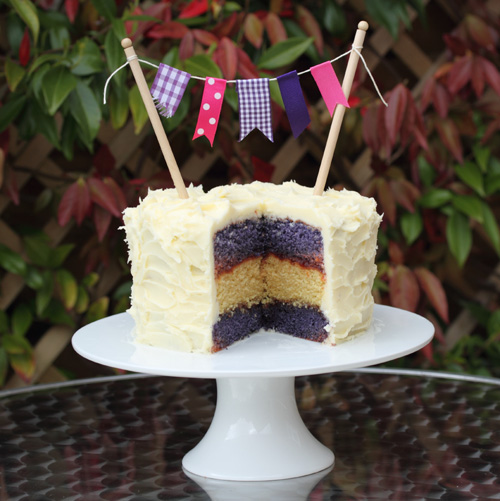
OOOH NO! The middle layer was pink!
It was pink when it went into the oven................pooos.
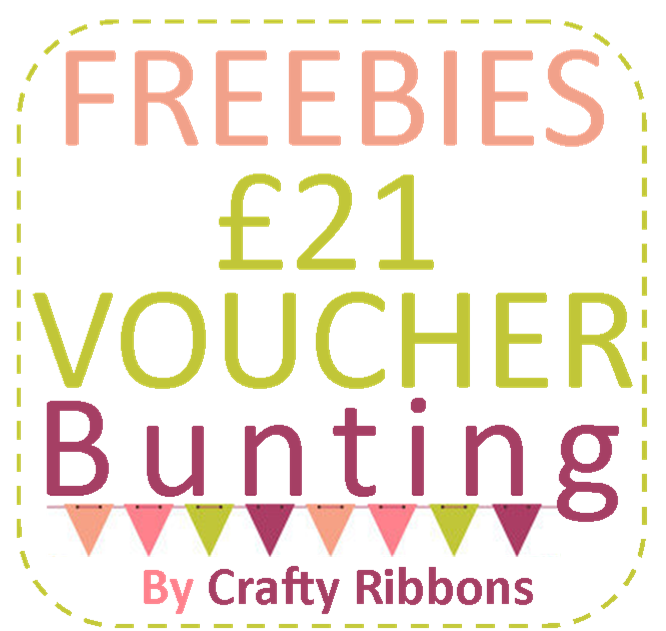
£21 = my age!!!!
We have a £21 voucher up for grabs.
We will pick the winner next Tuesday
Remember to refresh your screen after leaving a comment,
to ensure it has not been eaten. Any problems email it to us craftyribbons@gmail.com
Have a fantastic weekend everyone. I do hope you have enjoyed the Summer Bunting week as much as I have.
Holiday ribbon bundle winner is.....
21/05/2013
Mollie came to see me today and we made bunny masks together.......there is a little bit of ribbon used!
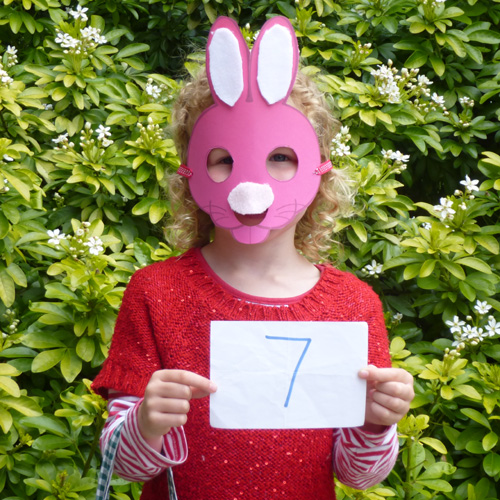
Mollie picked number 7 from our "Bingo" bag.
Number 7 = Louise
Lovely ribbons but I think you ought to include a brolly........just in case........and maybe a case too!
Plus a woolly jumper and a sun hat!........just to be prepared!
Best wishes,
Louise.
Congratulations Louise you are the winner of the bundle of summer ribbons. Please email bev.craftyribbons@gmail.com with your address and she will get the ribbons in the post to you. Thank you to everyone that joined in with our Friday FREEBIE and suggested other ribbons we could include.
Bev had a wonderful time in Devon and spent most of the weekend on the beach,
so snow boots we not needed!
Not always ribbons.....
14/05/2013
...........sometimes we do go out and play. Maybe not what you thought Mr & Mrs Craftyribbons would get up to, but I spotted this, and I thought of work........
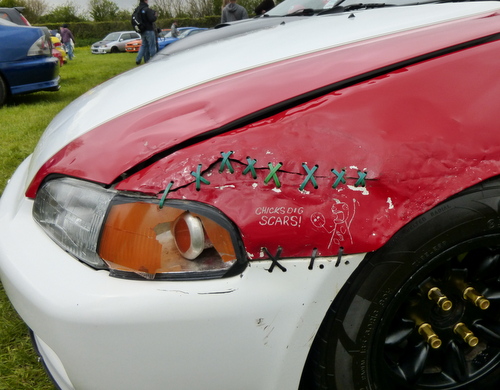
.....it just made me giggle. Cross stitch on a car, not using embroidery thread or even ribbon, but it is cross stitch!
What were we doing looking at cars? Well............... we have a bad boy in the family................
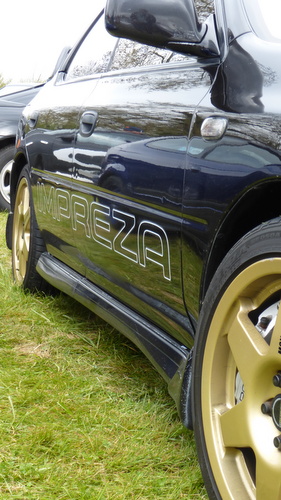
Meet Scooby. He is (one) of Tony's cars and he had an outing to Japfest at the weekend. Tony watched all the cars on the track, while I photographed all that moved. I have just got a point and shoot camera, and I pointed it at everything!!!!!
Scoobies are known for the back ends!
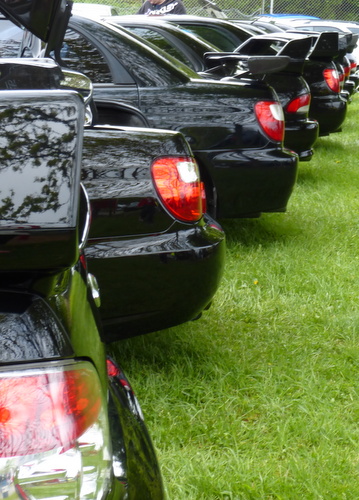
This tickled me, a line of big laddies showing off their bottoms.
I did try and persuade Tony that scooby could do with a re-spray

Nope that did not go down well. Tony driving a PINK car, a PINK Scooby car! I bought him a pink shirt a while back and told him it was raspberry. He wore it quite happily until a customer at an exhibition asked him for a pink ribbon the same colour as his shirt!
Back to ribbons - you all liked the stripe ribbons I see. Nice summery, deckchair-ish ribbons I would agree, but today I am freezing. I have my body warmer, scarf and gloves on and have even thought about making a hot water bottle!! Why has it gone so cold. It is pouring with rain, we have a metal roof and the rain is so heavy we can hardly hear each other. I have spent the last two days making things for a special event we are holding next week (will tell you more later in the week) but at this rate I should have made them waterproof!!!
Syd picked the winner of this weeks Friday FREEBIE (sorry been moonlighting as a portrait photographer, Syd had been watching me and wanted some photos taken! WOW look at that white background.)

Number 10 = Leah
Happy Friday Everyone ,
I love the stripy ribbons , We have a craft and wine weekend ahead I can`t wait, not sure what the crafts will look like after the wine , but I am sure we will all have a fab time.
Have a good weekend.
Leah
Congratulations Leah, you have a fab collection of 25mm stripe ribbons coming your way. Please email bev.craftyribbons@gmail.com and she will pop them into the post for you. Thank you to everyone that left us a super comment, hope you had as much fun over the weekend as we did.

 my basket